
Screen size and elevation for ceiling mounted digital signage

Atdec is a mount expert, with deep collective experience with displays and how they are best deployed. As a specialist designer and manufacturer, Atdec offers mounts for displays of virtually all sizes and weights, but we're display agnostic. 


This article is a guide to selecting the most appropriate screen size and elevation, based on our unbiased experience.
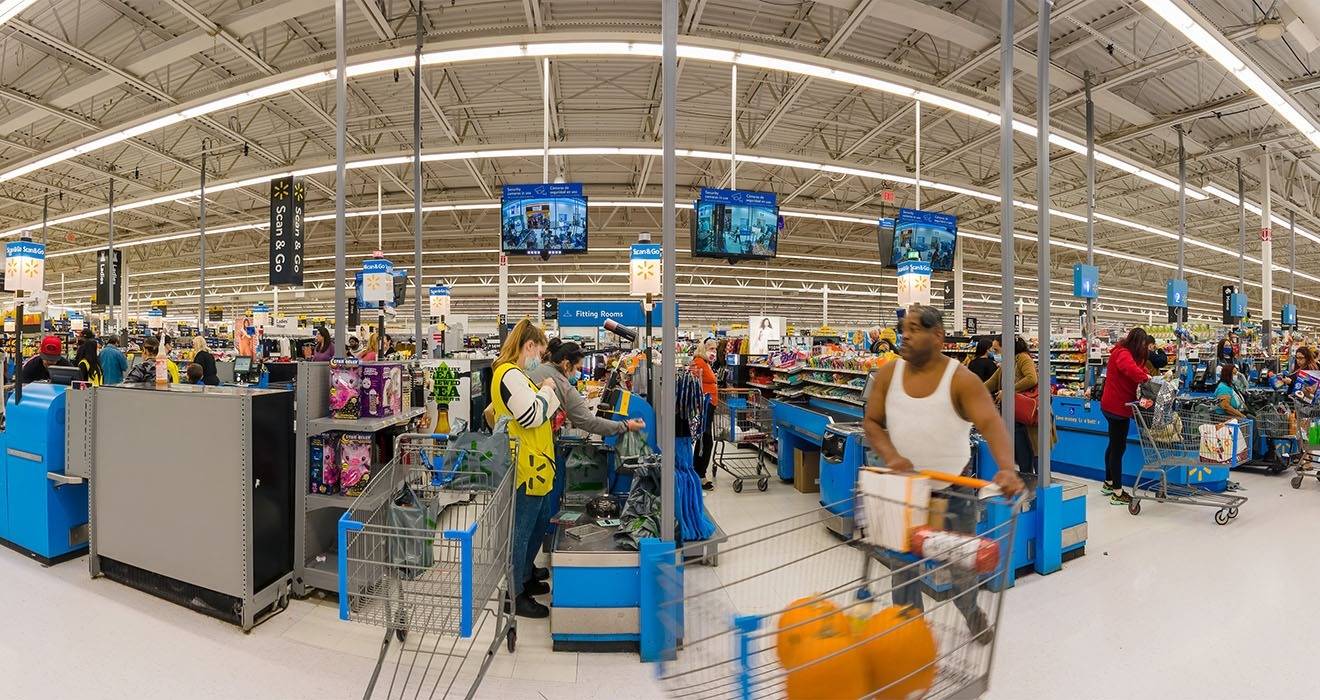
Atdec back-to-back ceiling mounted displays at Walmart in USA
keyboard_arrow_right   Back-to-back ceiling mounted displays on long-extension telescopic ceiling mounts, at Walmart USA
Ceiling mounting introduces two decisions that wall and floor projects rarely need to directly consider; how large the display needs to be to be visible to the expected audience, and how high it should sit. The two are linked. A screen suspended above a crowd is read from farther away and at a steeper angle than one at eye level, so size and elevation have to be resolved together. This guide walks through both, and then covers how Atdec helps once the numbers are settled.

Why ceiling mount at all

Ceiling mounting is the practical answer when the floor and the walls are unavailable or unsuitable. Common cases include open retail floors and aisles with no usable wall, quick service restaurant menu boards above a counter, wayfinding and information screens in concourses and transport hubs, and any high-traffic space where a display must remain visible over people, fixtures, or vehicles. It also suits double-sided (back-to-back) signage that needs to be read from two directions at once, which a wall can never provide.

Select display size

As with any signage decision, technical requirements come before aesthetics. Size for legibility first, then refine.

Minimum display size

A display is only doing its job if the intended audience can take in the content without eye strain. The same simple calculation used for wall signage applies overhead:


  • Determine the intended location of the display
  • Plot where the audience will be

  • Determine the maximum distance an audience member will be from the display

  • Divide that distance by six to give the minimum display height

The result is a floor, not a target. Round up rather than down, particularly for ceiling installations, because an overhead screen is frequently read on the move and at an angle, both of which reduce effective legibility.

How elevation changes the size decision

A ceiling mounted display is often viewed from a wide spread of distances at once: a menu board is read by the person at the counter and by the person at the back of the queue, and a concourse screen is read by someone directly beneath it and by someone approaching from thirty paces away. Size the display for the farthest relevant viewer, then confirm the display is not so large that the closest viewer has to crane upward to see the whole screen. Where those two requirements genuinely conflict, the usual resolution is to raise the mounting height slightly and further tilt the display, rather than to keep enlarging the screen.

Weight and the ceiling load path

Weight matters more for a ceiling project than for any other attachment point, because the entire load is suspended - and is frequently cantilevered - at the end of a drop. Confirm the display weight and VESA pattern against the mount before anything else. Every Atdec mount performs to its stated weight capacity and VESA range, so the specification on the page is the specification you can build to.


Professional installers are experienced in assessing ceiling construction and materials, to ensure the ceiling itself is appropriate to be mounted to. 

Select mounting elevation

Elevation is a balance between two competing demands: clearance below the display, and usable sightline to it. Set the height too low and it obstructs movement or gets knocked; set it too high and legibility falls away.

Clearance below

The lowest point of the display and mount must clear the people, and in some settings the equipment, that pass beneath it. As a working minimum in pedestrian areas, allow at least 2.1m (6'11") of clear height under the lowest point of the installation. Beware of ceiling mounted displays making the retail space feel cramped. Back-of-house, industrial, and logistics environments where forklifts, pallet movers, or tall equipment operate require considerably more, set by the site rather than by the display.

Sightline above

In an ideal world the vertical middle of a display sits close to standing eye level, around 1.5m (4'11") - most commonly meaning wall mounted. Ceiling mounting is used where that is impossible, so the practical aim shifts. Ceiling mounts aim keep the display within a comfortable cone of vision for the primary viewing position with a tilt to compensate for the height. As a rule of thumb, aim to keep the screen within roughly 30 degrees above the primary viewer's horizontal line of sight. The higher the display above eye level, the more downward tilt it needs so that its face is close to perpendicular to that sightline. Tilt is what keeps a high screen legible; without it, content at the top and bottom of the panel degrades and the image appears to lean away from the viewer.

Drop length

Drop length is the distance from the structural ceiling to the top of the display, and it is dictated by the ceiling height minus the elevation you have chosen. Low ceilings need a short, rigid drop; concourses, big-box retail, and warehouse spaces usually require larger drop, where lateral stability and sway become the governing concern. Match the drop hardware to the ceiling height rather than forcing a fixed length to fit. Atdec offers ceiling mounts with telescopic poles to match your drop need precisely - and with our modular ADB range, custom solutions to match exacting specifications.  

Environment guidance

The table below gives typical starting points. Treat clearance as a minimum and always confirm against site conditions and local requirements.
EnvironmentTypical ceiling heightClearance below displayElevation approachTilt
Retail aisle and open floor2.7m – 4m
9' – 13'
Min. 2.1m (6'11")Short drop; screen just above head heightSlight downward, 5–10°
QSR and counter menu boards2.7m – 3.5m
9' – 11'6"
Above counter and staff reachSized to the queue's farthest pointDownward toward the queue, 5–15°
Concourse and transport hubs4m+
13'+
Min. 2.4m (7'10") in dense pedestrian flowLong or telescopic drop; visible over crowdsModerate downward, 15–20°
Warehouse and industrial5m+
16'+
Set by vehicles and equipment on siteLong drop; stability criticalStrong downward, up to 20°

Single, double-sided, portrait, or landscape

Elevation planning should also settle the display's orientation and count. Aisles and concourses with two-way traffic are natural candidates for double-sided (back-to-back) configurations, doubling the audience from a single drop. Wayfinding and menu content often reads better in portrait; general information and video content usually suit landscape. Decide this alongside height, because it affects the mount, the drop, and the load path.

How Atdec helps

Setting an exact height across any ceiling

Ceiling heights are rarely uniform across a site, and few are a convenient round number. Atdec ceiling mounts use telescopic poles and modular pole options that let you set the display at the precise elevation you have calculated, rather than compromising the sightline to suit fixed hardware.

Fixing to the ceiling you actually have

The structure overhead is not always simple. Atdec has ceiling mounts suited to concrete, timber, and that accomodate suspended or false ceilings, so the fixing method fits the building rather than the other way around. Where the ceiling is genuinely awkward, Atdec Uncover and Atdec Custom exist to work the problem through with you.

Dialling in tilt and orientation

Because elevation almost always calls for downward tilt, Atdec ceiling mounts provide tilt at the display head to bring the face square to the viewer, along with rotation for portrait or landscape, and back-to-back configurations for double-sided signage in aisles and concourses.

Accurate, tested load ratings

A suspended, cantilevered load is the least forgiving mounting scenario there is. Every Atdec mount is tested and rated so that the stated weight capacity and VESA range are the specification you can rely on, with no guesswork about margins.

Frequently asked questions

No. A ceiling mount transfers the full suspended load into the structure above, so the fixing point has to be a genuine structural member: concrete slab, structural timber, or steel. A plasterboard or tile surface on a suspended ceiling is not structural on its own; the mount must be fixed to the slab or joists above it, with the drop passing through the finished ceiling. Confirm what sits above the visible ceiling before specifying.
Cabling is routed to the ceiling and then down the drop to the display. Power at the ceiling usually needs a electrician; signal and network cabling can be run alongside. Plan the cable path before install, because retrofitting power to a ceiling point after the fact is the most common source of cost blowout on these projects. Atdec ceiling mounts encourage running cables through the pole. 
Access is the trade-off you accept for height and convenience of ceiling mounting. Displays needing frequent access (content changes, cleaning, port access) are better kept lower. Factor in how a technician will reach it safely before you commit to a height.
Yes. The longer the drop, the more leverage any movement or air disturbance exerts at the fixing point, and the more a display can sway. Long drops benefit from a rigid pole rather than a jointed one, and in some cases from additional bracing. This is why the guidance for tall spaces favours lowering the display on a controlled drop over relying on tilt alone. Atdec ceiling mounts are high performance and well engineered so that you can rely on our ratings to the extremity of the stated ranges. 
Technically yes - a ceiling mount could be removed and changed to a new position. However the attachment will leave holes, so we recommend the fixing point be considered effectively permanent once the ceiling is made good. You should treat the location as a set-and-forget decision. Tilt and rotation at the display head can be adjusted afterward for fine-tuning, as can the drop length (albeit with removal of the display first). But the drop position itself cannot move without re-fixing and repairing the ceiling.
Unlikely at the smaller end of displays, as the VESA is likely 100x100 or 200x200 making the brackets suitable regardless of orientation. Small to medium displays don't have physical dimensions likely to make a material difference to load - but always check your ceiling mount for orientation suitability. 


Ceiling mounts for larger displays are more likely to have larger and assymetric VESA which may change the VESA brackets required. Physical dimensions are more significant for larger displays. Portrait orientation shifts the load distribution and, on larger displays, may sit outside a mount's rated orientation, so confirm the mount is rated for portrait use at your display's weight rather than assuming a landscape rating carries across.

Questions? Let us help.

Call us
8.30am to 5:30pm, PST 888 303 4252
Send an email
We will respond quickly SEND AN EMAIL